


Step-by-Step: Managing High Stitch Counts and Density in Photo Digitizing
Introduction
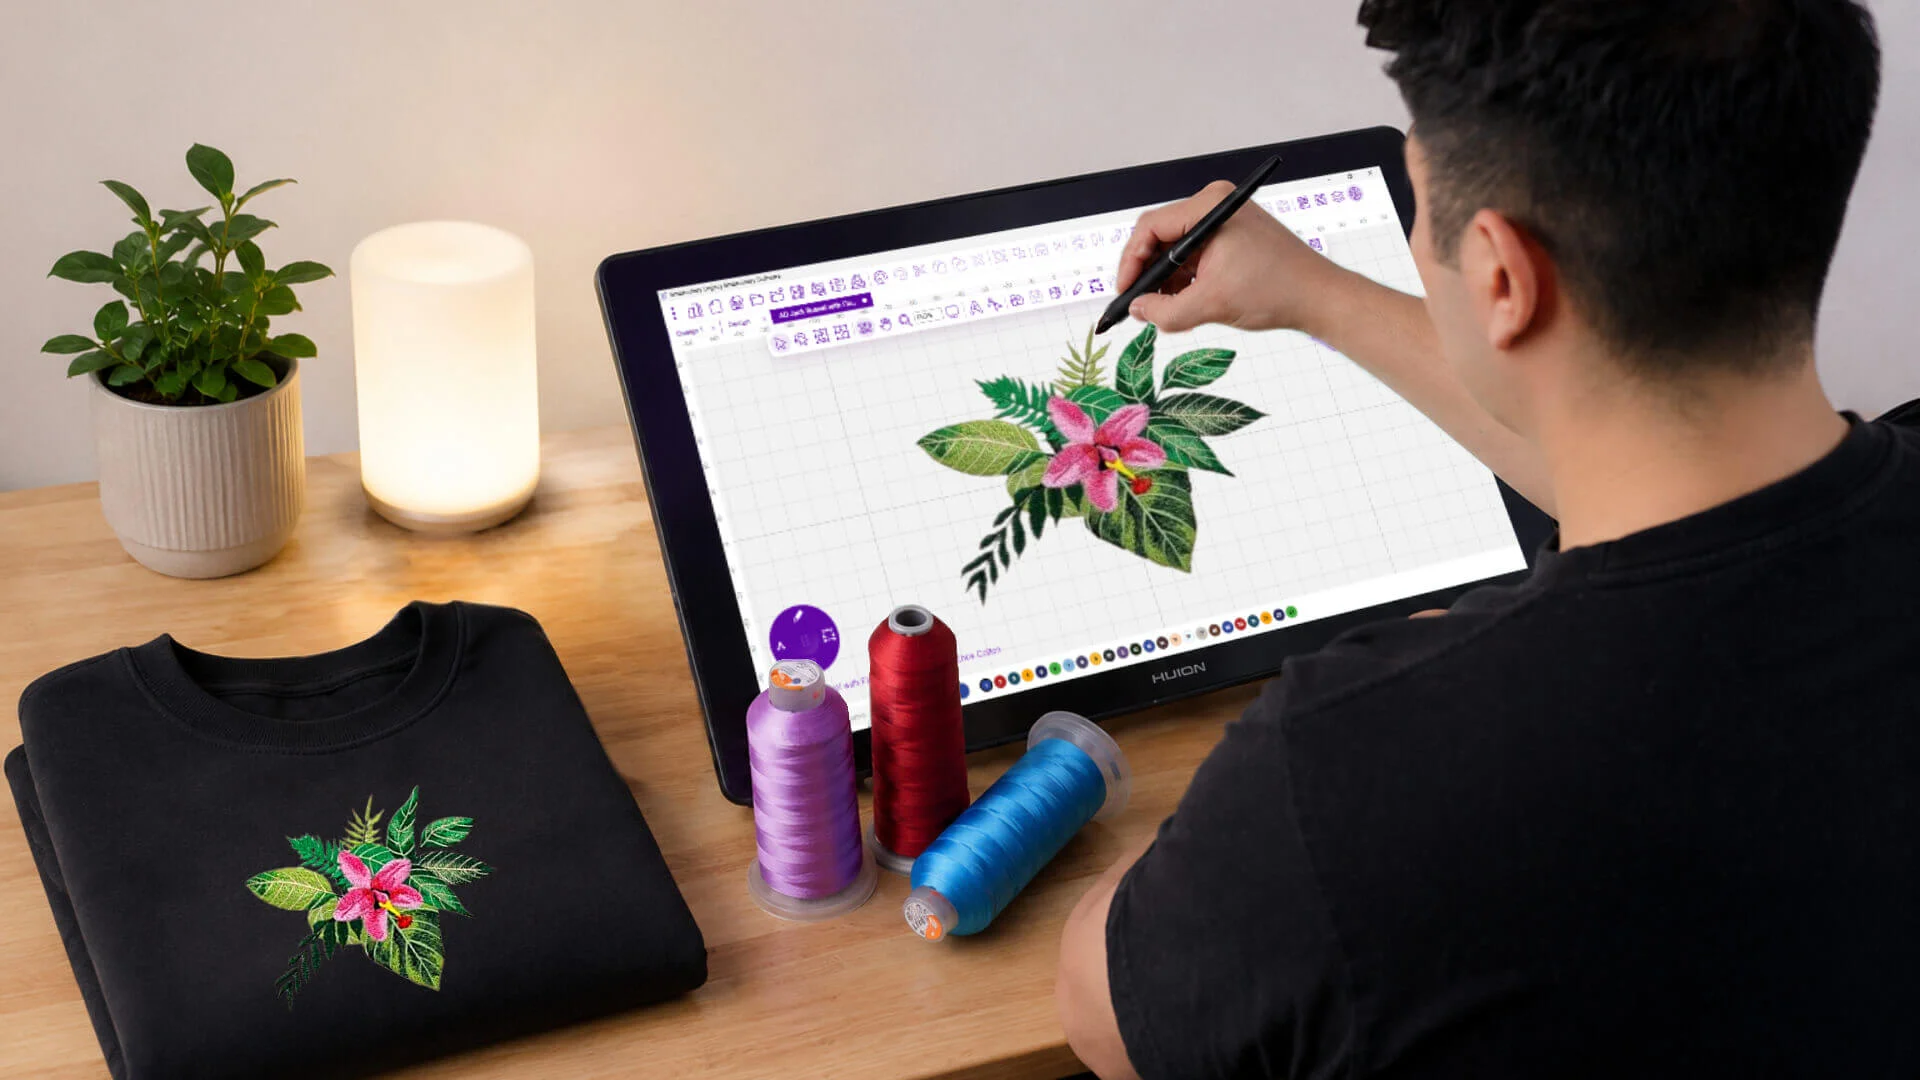
Photo digitizing is easily one of the most advanced forms of embroidery out there today. It allows commercial machines to recreate human faces, family portraits, beloved pets, and landscapes. It converts pixels into real thread.
Standard logos are pretty simple. Photo embroidery is completely different. It packs tiny details, frequent color changes, and complex shading. This makes the workspace way more intense.
Many apparel businesses lean hard on professional photo digitizing services. Photo designs demand serious planning and expert stitch management.
Managing crazy high stitch counts is the hardest part. Shoving too many stitches into one spot ruins everything. Your design gets heavy, warped, and impossible to sew cleanly. Conversely, skimping on stitches makes details vanish. The final picture looks cheap and half-baked.
Pros know that flawless photo embroidery is not about stacking thread. It is about placing the right needles in the perfect spots.
Smart stitch control keeps designs sharp and stable on your garments. This step-by-step guide helps you manage crazy stitch counts easily. These real-world tips will elevate your production quality instantly.
Understanding Photo Digitizing
Photo digitizing converts a regular digital picture into an active embroidery file. The digitizer studies highlights, depth, and unique textures. Then, they map out the paths.
Unlike standard text logos, photos require chaotic stitch directions. You need multiple thread colors blending together. The ultimate goal is mimicking the source photograph perfectly.
This requires immense strategy. Embroidery machines have physical limits. Thread cannot match every single pixel on your monitor. A smart digitizer simplifies complex spots while saving the vital visual anchors.
Why High Stitch Counts Become a Problem
Adding excessive stitches is a classic amateur mistake. Beginners think more thread equals hyper-realism. In reality, massive stitch counts trigger immediate disasters.
Jamming too many stitches together stresses your fabric. The garment turns stiff, bulky, and weirdly warped. It completely ruins the apparel's comfort.
Plus, it jacks up your machine run times. Your production costs will skyrocket.
Super dense zones can actually hide details. The threads blend into a messy, unreadable lump. Elite digitizers value efficiency over raw volume. They chase clean results using fewer stitches.
Understanding Stitch Density
Stitch density measures how close your threads sit together. It dictates the tightness of your stitched design.
Density changes everything in photo embroidery. It impacts texture, look, and wearability. Getting it right blends colors smoothly while stabilizing the fabric base.
When density runs too high, threads pile up aggressively. The design gets thick and won't sit right. If it is too loose, the shirt shows through. That tanks your final quality. Managing this balance is a mandatory digitizing skill.
Step One: Start With the Right Image
Every amazing photo project starts with an awesome graphic source. Crisp, high-contrast photos are infinitely easier to digitize. Blurry files are a total nightmare.
Strong lighting helps tremendously. It allows the digitizer to track shadows and highlights accurately. Sharp details guide your needle placement perfectly. This eliminates guesswork and unnecessary stitches. Starting with a great file saves hours of editing later.
Focus on Important Details
Your machine cannot replicate every microscopic detail from the photo. Experienced digitizers isolate the core features. They focus their energy right there. This keeps stitch counts low while maintaining instant recognition.
Step Two: Simplify the Artwork
Learning what to cut is an essential digitizing skill. Embroidery simply does not need every single background pixel.
Trimming the fat drops your stitch counts instantly. It makes the machine run beautifully.
Get rid of fuzzy textures, tiny background shadows, and clutter. Your design becomes cleaner, sharper, and much easier to look at.
Less is truly more here: Stripping away the chaos highlights the real artwork.
A clean, calculated design always beats an overcrowded thread bomb.
Step Three: Use Proper Stitch Types
Different stitch types accomplish different goals. Picking the right ones controls density while boosting visual clarity.
Fill stitches work miracles on spacious zones. They offer smooth coverage without creating nasty thread mounds. Use light running stitches for crisp lines and soft transitions.
Your stitch choices directly impact machine efficiency.
|
Stitch Type |
Best For |
Benefit |
|
Fill Stitch |
Large background areas |
Smooth coverage, prevents thread mounds |
|
Running Stitch |
Fine lines, wrinkles, hair |
Crisp detail without adding bulk |
Match the Stitch to the Area
Never use identical stitch settings across the whole file. Big zones need different parameters than tiny facial features. Adjust your settings block by block. This moves density away from tight spots.
Step Four: Control Layering Carefully
Creating depth requires layering different colors. But reckless layering blows up your stitch count fast.
Every single layer needs a distinct job. Delete overlapping segments hidden underneath top layers.
Pros map out the color sequence meticulously. This stops thread build-up while locking in that gorgeous 3D depth.
Step Five: Use Color Blending Wisely
Color blending creates realism. It blends thread shades naturally to mimic real gradients.
However, blending can accidentally double your stitch counts. The trick is blending efficiently.
Skilled pros use smart spacing instead of heavy thread dumping. You can build incredible depth without packing the canvas tightly. Strategic placement beats high volume every time.
Step Six: Monitor Fabric Behavior
Fabrics react uniquely to thousands of needle penetrations. A file that runs perfectly on canvas might shred a polo.
Heavy stitches cause light materials to pucker and bunch up. You must tailor your density to the garment.
Always check your fabric characteristics first. Testing the file on the exact material prevents production disasters.
Fabric Stability Matters
Heavy denim handles dense stitching way better than thin cotton. Matching your digitizing style to the garment weight guarantees durability. It keeps the final product looking professional.
Step Seven: Use Underlay Correctly
Underlay stitches stabilize your fabric and support the top layers. But abusing underlay ruins your density goals.
The base should secure the fabric without creating a giant ridge. Proper underlay builds flexibility.
Masters balance hidden stability with production efficiency. Keep it light. Basic grid underlays usually work better than dense filled paths. It drops unnecessary bulk instantly.
Step Eight: Check Stitch Count Regularly
Track your stitch count while you digitize. Do not wait until the file is exported.
Fixing density at the very end is incredibly tough. Checking numbers periodically lets you fix issues immediately. Evaluate your counts after finishing every major section. Look for sneaky ways to trim thread.
Step Nine: Perform Sample Stitch-Outs
Testing is absolutely non-negotiable. Files that look incredible on a monitor can turn chaotic on a machine.
Sample sew-outs expose hidden density traps, puckering, and thread loops. It shows you the truth.
Testing highlights exactly what needs tweaking before you ruin a customer's jacket.
Step Ten: Refine and Optimize
The final step is all about editing and streamlining. Review your completed file with a critical eye.
Look for areas to shave down thread volume safely. Check your blending zones and transitions. Optimization ensures your file runs smoothly without constant thread breaks. It maximizes machine speed while protecting realism.
Common Mistakes That Increase Stitch Counts
Many digitizers over-complicate files by chasing every single detail. This results in heavy, stiff patches that look muddy.
Stitch-blending shadows with thick layers is another trap. Shading is vital, but over-layering creates a rock-hard design.
Ignoring fabric types also ruins jobs. A file built for a thick hoodie will destroy a summer t-shirt. Avoiding these traps keeps your work balanced.
Why Experience Matters in Photo Digitizing
Photo digitizing marries artistic vision with technical machine math. Experience teaches you how to balance clarity with production speed.
After running numerous projects, you learn exactly how thread moves. You discover how fabrics warp.
You learn to create stunning illusions using fewer needles. That wisdom comes from endless testing and real-world troubleshooting.
Conclusion
Controlling stitch counts and density is the secret to elite photo digitizing. Stacking endless thread is a trap. True perfection requires smart planning and clean paths.
Start with sharp art, simplify the details, control your layers, and test everything. Your designs will pop beautifully without ruining the fabric.
Success is all about balance. Protect the core details while respecting machine efficiency.
For businesses looking to convert old physical photos to digital format, mastering density is everything. It is the absolute key to creating breathtaking, wearable embroidered artwork that lasts forever.
Kategoriler
Read More
Professional Painting is one of the most practical ways to improve the appearance, durability, and value of your property. Whether you own a home or a commercial building, a fresh coat of paint can transform outdated spaces into bright, welcoming environments. More importantly, quality painting protects surfaces from daily wear, moisture, and changing weather conditions, making...
Introduction Eyelash extensions are one of the most popular beauty treatments for enhancing natural lashes without the need for daily mascara or strip lashes. In Carindale, this beauty service has become increasingly in demand as more people look for convenient, long-lasting ways to improve their appearance. Whether you prefer a soft and natural enhancement or bold, dramatic lashes,...
Technology has become part of everyday life, but not everyone understands how to solve technical problems quickly. Many beginners struggle with slow internet connections, app errors, software issues, device settings, or confusing online instructions. Searching for answers online can sometimes feel overwhelming because many websites use technical language that is difficult to understand. This is...

AviaGames introduces Mahjong Rumble, a skill-based mahjong game that brings a competitive and fast-paced twist to classic tile-matching gameplay. As the developer of Solitaire Clash, Bingo Tour, and 8 Ball Strike, AviaGames continues to expand its lineup with games focused on fair competition, accessible gameplay, and engaging seasonal events. Mahjong Rumble is available as a free...
" Boron Nitride Nanotubes in Nanomedicine Market Summary: According to the latest report published by Data Bridge Market Research, the Boron Nitride Nanotubes in Nanomedicine Market The global boron nitride nanotubes in nanomedicine market size was valued at USD 14.50 Million in 2025 and is expected to reach USD 29.75 Million by 2033, at a CAGR of...
