Basement Sealing and Waterproofing Professional Strategies to Prevent Leaks and Mold
You can stop basement water problems before they start by targeting the actual entry points—cracks, poor exterior drainage, and failing interior systems—and choosing the right mix of sealants, drainage, and a sump pump for lasting protection. Professional basement sealing and waterproofing solutions help address those specific weak spots, letting you keep moisture out, protect your structure, and avoid costly repairs. This post will show how to identify where water gets in, what repairs matter most, and which waterproofing methods work for different budgets and basements. Expect clear, practical steps you can apply whether you plan a DIY fix or hire a pro. Choosing reliable basement sealing and waterproofing methods can improve your home’s durability and prevent long-term water damage.
Understanding Water Intrusion
Water gets into basements through specific pathways and shows predictable signs. Knowing what forces drive leaks and what to look for helps you prioritize repairs and choose effective waterproofing.
Common Causes of Basement Leaks
- Poor exterior drainage. Soil that slopes toward your foundation, clogged gutters, or downspouts that dump water next to the house concentrate runoff against the wall and increase hydrostatic pressure.
- Faulty or absent perimeter drainage. Failed weeping tiles, blocked discharge lines, or no footing drain forces groundwater to find the weakest point in the foundation.
- Cracks and construction joints. Hairline cracks, settlement gaps, and cold joints allow pressurized water to seep through concrete or block walls.
- High groundwater or surface water events. Rapid snowmelt, heavy rains, or a high water table can create sustained water pressure against foundation walls and floors.
- Plumbing leaks and interior sources. Burst pipes, leaking appliances, or condensation can mimic external intrusion but require a different repair approach.
Address the root cause: correct exterior grade and drainage first, then repair cracks and evaluate perimeter systems.
Identifying Signs of Moisture Problems
Look for visible water like pooling on the floor or active drips from wall/floor joints; that indicates current intrusion needing immediate action. Check for damp stains and efflorescence—white mineral deposits on masonry—signaling ongoing seepage through concrete. Monitor for mold or musty odors in corners, around stored items, or behind drywall; mold often grows where humidity stays above 60%. Inspect for peeling paint, flaking plaster, or displaced mortar, which point to repeated wet/dry cycles that weaken materials. Use a moisture meter on walls and floors to quantify dampness and a hygrometer in the room to track relative humidity. Document locations, frequency, and conditions (after rain, during thaw, continuously) to guide whether you need interior sealing, exterior excavation, or drainage upgrades.
Effective Protection Strategies
Focus on directing water away from your foundation, fixing entry points, and selecting durable materials that match your climate and soil conditions. Prioritize drainage, structural repairs, and proven barrier systems to stop leaks and control moisture.
Exterior Waterproofing Techniques
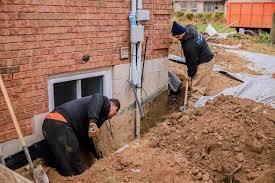
Exterior work prevents water before it hits the wall and usually lasts longest. Excavate around the foundation to expose the footing, then apply a polymer-modified asphalt or liquid rubber membrane directly to clean, dry concrete. Combine the membrane with a protection board to prevent backfill damage. Install a perimeter drainage system (exterior footing drain) at the base of the foundation and route it to a gravity outlet or sump. Use perforated pipe in washed gravel and wrap the pipe with geotextile to prevent clogging. Improve surface drainage too: regrade soil to slope 6 inches over the first 10 feet and extend downspouts at least 6 feet from the foundation. Consider insulation-integrated systems in cold climates to reduce freeze–thaw cycling. Expect higher labor and excavation costs, but exterior systems reduce hydrostatic pressure and repair active leaks at their source.
Interior Sealing Solutions
Interior methods stop or manage water that already penetrates the wall and are faster and less expensive than exterior excavation. Seal hairline cracks and joints with hydraulic cement or polyurethane injection foam; use epoxy for structural crack repair. Apply a vapor-retarding masonry coating to reduce moisture migration through concrete or block walls. Install an interior perimeter drain and sump pump when water enters through the footing or when hydrostatic pressure is present. Choose a pump with a battery backup and alarm for reliability. Use dehumidifiers rated for your basement size and place them where airflow is restricted. Interior finishes need moisture-tolerant materials—cement board, closed-cell insulation, and water-resistant flooring—to avoid mold and rot. Interior techniques address symptoms quickly but should pair with exterior drainage fixes for long-term protection.
Choosing the Right Materials
Match materials to the problem, soil, and climate to ensure longevity. For membranes, select polymer-modified asphalt or rubberized asphalt for adhesion and flexibility; choose thickness per manufacturer guidelines for your soil movement and exposure. Look for ISO or ASTM standards on product datasheets. For drainage pipe, use 4-inch perforated HDPE or PVC with a clean gravel envelope and geotextile filter. Pick sump pumps sized by pump curve and basement inflow; a common rule is 1/2 to 1 HP for larger basements or high inflow conditions. For sealants, use hydraulic cement for active leaks, polyurethane for crack injection, and epoxy for structural bonding. Verify warranties, UV resistance (for exposed sections), and freeze–thaw ratings. Work with products tested for below-grade use, and keep manufacturer installation instructions on-site to avoid voiding warranties.
Categories
Read More
The latest partnership between PUBG Mobile and Balenciaga has introduced a fresh wave of luxury fashion into the gaming universe, captivating players worldwide. Starting from November 14th and running through December 15th, 2025, this exclusive event features couture-inspired outfits that elevate in-game style to new heights. Balenciaga has expanded its influence beyond digital boundaries by...

Life becomes challenging when relationships lose harmony and emotional peace fades. Many people struggle silently with marital conflicts, unexplained negativity, or emotional distance that seems impossible to fix through conversation alone. In such moments, astrology provides a deeper perspective by revealing unseen influences affecting thoughts, emotions, and behavior. When approached...

CNC Tool Selection Made Simple for Beginners Starting with machining can feel overwhelming, especially when it comes to selecting the right tools. In modern manufacturing, precision, efficiency, and consistency are essential—and all of these depend heavily on choosing the right CNC tool. Whether you are a beginner, a workshop owner, or a production manager, understanding how to...

BP Zone is a natural supplement designed to support healthy blood pressure levels and promote overall cardiovascular health. In today’s fast-paced lifestyle, factors like stress, poor diet, and lack of physical activity can negatively impact heart health. BP Zone offers a simple, natural approach by helping the body maintain balance, improve circulation, and support steady blood flow...
"Detailed Analysis of Executive Summary Fish Protein Hydrolysate Market Size and Share Data Bridge Market Research analyses that the global fish protein hydrolysate market which was USD 254.75 million in 2022, is expected to reach USD 359.76 million by 2030, and is expected to undergo a CAGR of 4.4% during the forecast period from 2023-2030. This Fish Protein Hydrolysate...