Adu Homes Smart Design and Profitable Rental Strategies
You can add a self-contained living space on your property that increases flexibility, potential rental income, and options for multi-generational living without moving your household. ADU homes provide a compact, independent living solution—complete with its own entrance, kitchen, bath, and sleeping area—that fits on the same lot as your primary house. This article walks you through the practical choices that shape ADU design, the common types you can build, and what to expect from zoning, permits, and construction so you can plan realistically and move forward with confidence. Explore how layout, size, and local rules will affect cost, timeline, and the living experience to decide which ADU homes approach suits your goals.
Types and Design Considerations
You’ll decide between a separate structure or one connected to the primary home, and then layout the interior to balance privacy, function, and code requirements.
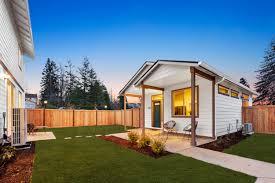
Detached vs. Attached Units
A detached ADU stands alone on your lot and gives full privacy for tenants or family. You can place it to maximize sunlight, create a private yard, and design a separate entrance and utility metering. Expect higher site-prep and foundation costs, plus stricter setback and height rules from local zoning. An attached ADU uses shared walls or additions to the main house, typically costing less for foundation and utilities. It’s easier to hook into existing HVAC, plumbing, and electrical, but you must plan soundproofing and independent access to preserve privacy. Check easements, fire separation, and whether the addition changes your home’s footprint for permit review.
Considerations table:
- Size: Detached up to local max (often ~1,200 sq ft); attached often smaller.
- Privacy: Detached = high; attached = moderate with design treatment.
- Cost: Detached > attached (site + foundation).
- Permits: Both require review; detached may trigger additional site standards.
Interior Layout Optimization
Arrange a compact but functional floor plan that includes a full kitchen, bathroom, sleeping area, and storage. Prioritize an open living/kitchen zone to improve usable square footage and allow flexible furniture layouts. Use built-in storage, lofted beds, and pocket doors to save circulation space. Place wet walls (kitchen/bath) adjacent or stacked to the primary house when possible to reduce plumbing runs and costs. Plan for natural light—skylights or clerestory windows work well on narrow lots. Design HVAC and electrical with future adaptability in mind: separate meters if you plan to rent, and conduit access for upgrades to heat pumps or EV charging.
Zoning, Permitting, and Construction Process
You need to confirm zoning allowances, secure permits, and follow an organized construction sequence. Expect site reviews, inspections, and coordination with designers and contractors.
Navigating Local Regulations
Check your municipal zoning map and the local zoning code for ADU-specific rules like maximum unit size, height limits, and required setbacks. Some cities allow detached ADUs, attached additions, or basement conversions; others limit occupancy or owner-occupancy requirements. Prepare these documents early: site plan, floor plans, structural details, and utility connection plans. Ask the planning department whether pre-approved ADU plans exist—using one can shorten review time and reduce design costs. Confirm fee waivers or reduced permit fees; many jurisdictions now offer ADU incentives. Track timelines for planning review, building permit review, and any public notices so you can plan financing and contractor scheduling.
Building Timeline and Key Steps
Start with a feasibility assessment that checks lot coverage, grading, utilities, and sewer capacity. Hire an architect or ADU specialist to produce permit-ready drawings and an engineer for structural or grading needs. Typical milestones: permit application → permit approval → site prep and foundation → framing and roofing → rough-in utilities → insulation and drywall → finishes → final inspections and occupancy sign-off. Expect 8–12 months for most projects, longer for major site work or complex reviews. Schedule inspections at foundation, framing, and final stages and coordinate utility hookups early to avoid delays. Keep a checklist of permit conditions and inspection dates so you can address issues promptly.
Categorii
Citeste mai mult
I still remember the moment I stared at a Sports Toto page and felt like I’d walked into a room where everyone spoke a language I didn’t know. I thought I understood how choices worked—pick an outcome, wait, and hope—but the more I scrolled, the more I realized I didn’t grasp the structure behind it. I had that uneasy feeling you get when you know...

In today’s fast-paced world, our smartphones have become more than just devices—they are lifelines. From attending online classes to managing work, connecting with friends, and even shopping, our phones play a crucial role. Houstonians, in particular, have shown a growing preference for local services when it comes to cell phone repairs and upgrades. Many residents trust businesses...
Making Blue Prism AIE02 Exam Study Simple and Stress-Free Preparing for the Blue Prism AIE02 exam does not have to feel stressful or confusing. Many students struggle because they study too much without a clear plan. They read many resources but still feel unsure about what really matters for the exam. Choosing clear and trusted Blue Prism AIE02 study material makes preparation simple, focused,...

In today’s competitive digital landscape, choosing the right digital marketing agencies in Delhi NCR can significantly impact your business growth. Whether you are a startup or an established brand, a professional agency helps you build visibility, generate leads, and improve conversions using data-driven strategies. With the rise of online competition in India, businesses now rely on...

Global rhodium market, valued at USD 2.37 billion in 2024, is projected to grow from USD 2.51 billion in 2025 to USD 3.83 billion by 2032, exhibiting a compound annual growth rate (CAGR) of 5.4% during the forecast period. The influence of post-pandemic recovery and geopolitical tensions were considered while estimating market sizes. Download FREE Sample Report:...