


Prototyping and User Testing: A Step-by-Step UX Workflow
Creating a successful digital product requires more than attractive visuals. A product must be easy to use, useful for the target audience, and aligned with real business goals. This is where prototyping and user testing become essential parts of the UX design process.
Instead of moving directly from an idea to development, teams can use prototypes to explore design concepts, test user flows, collect feedback, and improve the experience before investing heavily in coding. Whether you are building a mobile app, SaaS platform, website, or eCommerce store, a clear UX workflow helps reduce guesswork and leads to better design decisions.
For startups, product teams, and any UI UX Design agency, this process is valuable because it creates a bridge between business strategy, user needs, and technical execution.
What Is Prototyping in UX Design?
Prototyping is the process of creating an early model of a digital product. It can be simple, such as a paper sketch or wireframe, or highly detailed, such as an interactive clickable design that looks close to the final product.
The purpose of a prototype is not to create a perfect design immediately. Instead, it helps teams explore ideas, test usability, and understand whether users can complete important tasks smoothly.
Common types of prototypes include:
- Paper prototypes: Quick hand-drawn layouts used in early brainstorming.
- Low-fidelity prototypes: Basic wireframes that focus on structure and flow.
- Mid-fidelity prototypes: More detailed layouts with clearer navigation and content placement.
- High-fidelity prototypes: Interactive designs that closely resemble the final product.
Each type has its own purpose. Early prototypes are useful for speed and flexibility, while high-fidelity prototypes are better for testing detailed interactions and visual design.
What Is User Testing?
User testing is the process of observing real or representative users as they interact with a design. The goal is to understand how users think, where they struggle, and what improvements can make the product easier to use.
Instead of relying only on internal opinions, user testing gives teams practical insights based on real behavior. This makes the design process more reliable and user-centered.
User testing can help answer questions such as:
- Can users complete the main task without confusion?
- Is the navigation clear?
- Are buttons, forms, and content easy to understand?
- Where do users hesitate or make mistakes?
- Does the design match user expectations?
When done correctly, prototyping and user testing help teams identify usability issues before development begins.
Why Prototyping and User Testing Matter
A product may look visually impressive but still fail if users cannot understand how to use it. Prototyping and testing help prevent this by validating design decisions early.
The main benefits include:
- Reduced development risk: Problems are discovered before developers spend time building the final product.
- Better user experience: Feedback helps improve navigation, layout, and usability.
- Faster decision-making: Teams can compare design options and choose the most effective one.
- Lower revision costs: Fixing issues in a prototype is usually easier than changing a developed product.
- Stronger stakeholder alignment: Interactive prototypes make it easier for clients, designers, and developers to understand the product vision.
For any business working with a UI UX Design agency, this workflow can make the design process more transparent, collaborative, and outcome-focused.
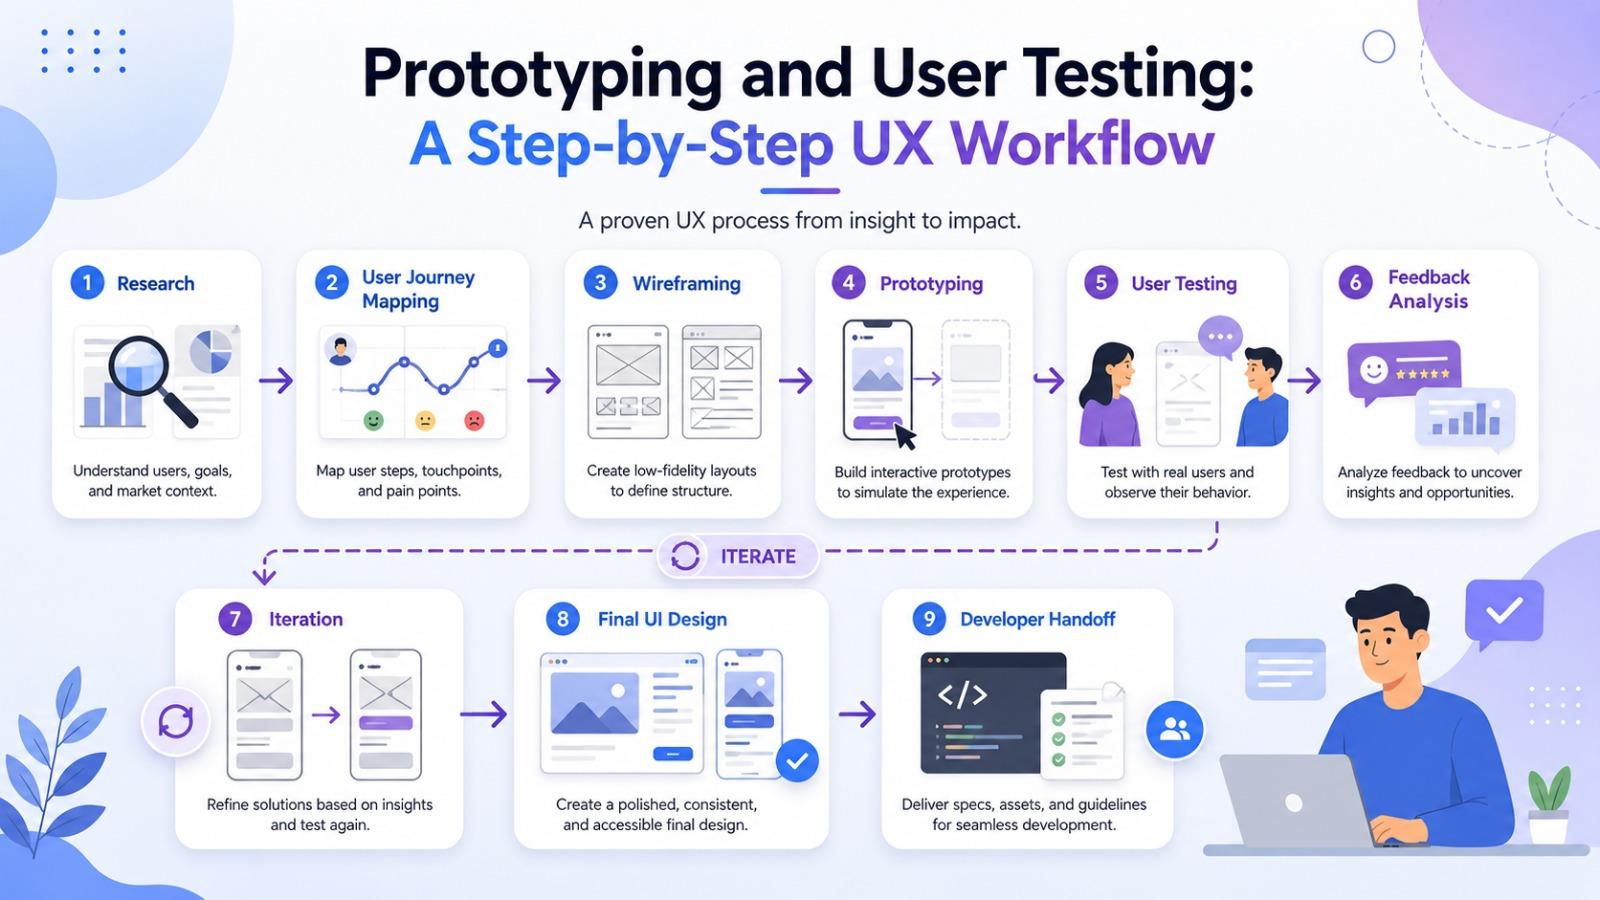
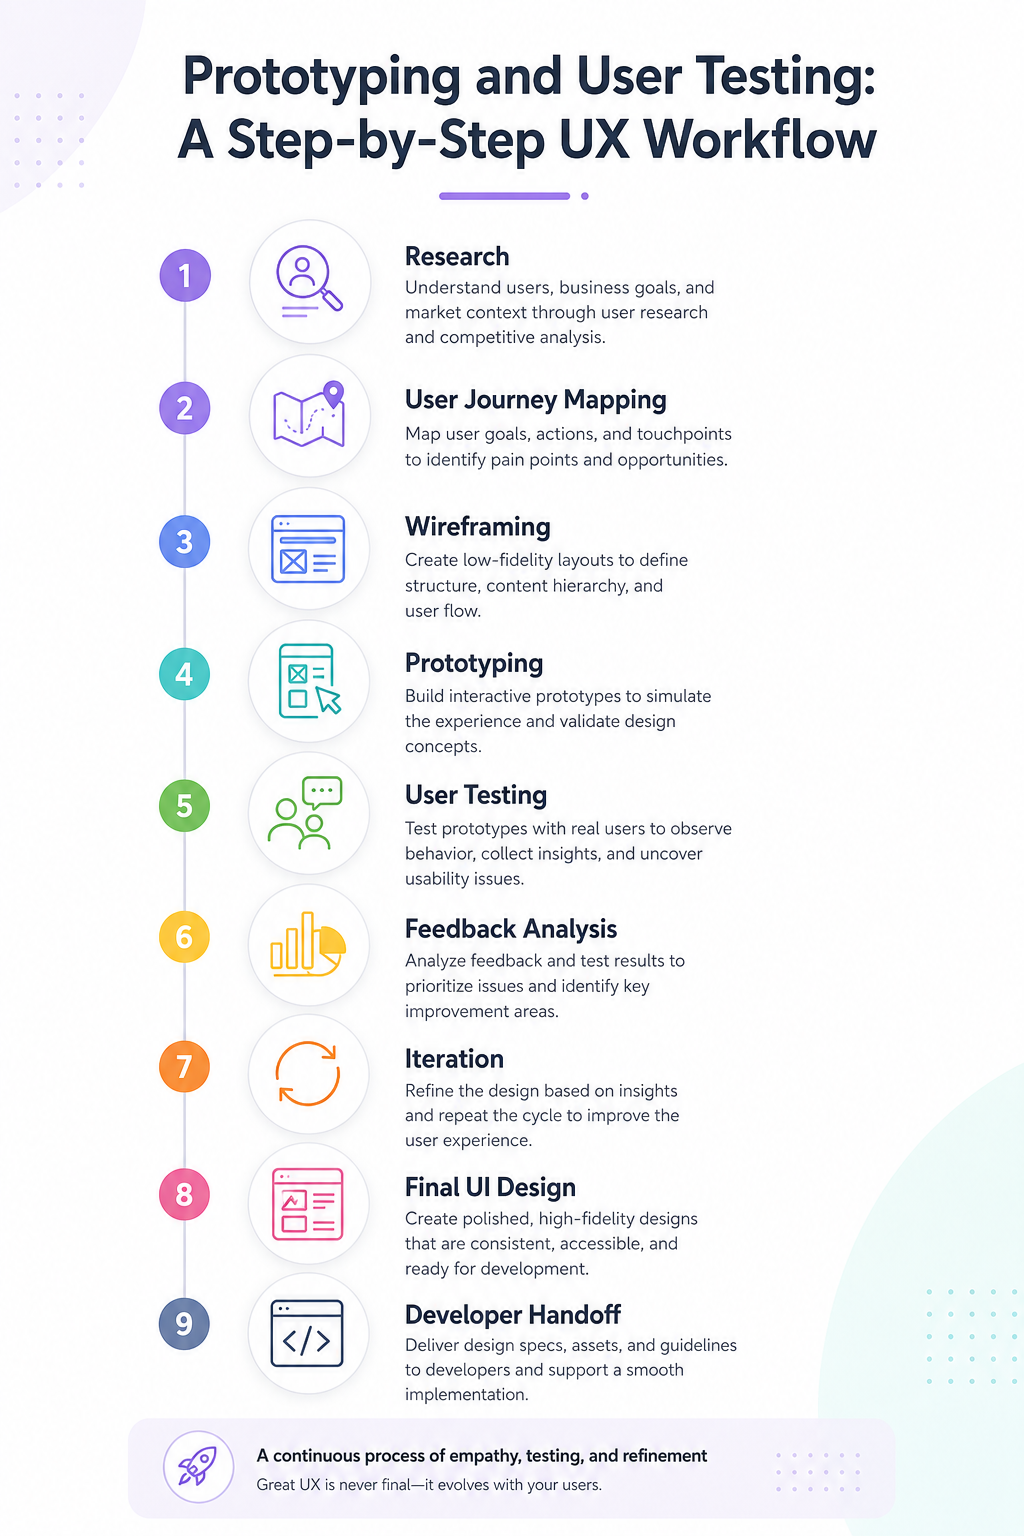
Step-by-Step UX Workflow
Step 1: Research and Define User Needs
Every strong UX workflow begins with research. Before designing screens, teams need to understand the target audience, their goals, their pain points, and the context in which they will use the product.
Research methods may include:
- User interviews
- Surveys
- Competitor analysis
- Market research
- Analytics review
- Customer support feedback
- Stakeholder interviews
The goal is to identify what users actually need, not just what the business assumes they need.
Key outputs from this stage include:
- User personas
- Problem statements
- User journey maps
- Feature priorities
- User goals and pain points
This stage creates the foundation for the entire design process.
Step 2: Map the User Journey
Once user needs are clear, the next step is to map how users will move through the product. A user journey map shows the steps users take to complete a goal, from the first interaction to the final action.
For example, in an eCommerce app, the journey might include:
- Landing on the homepage
- Searching for a product
- Viewing product details
- Adding the item to the cart
- Completing checkout
- Receiving confirmation
Mapping the journey helps designers identify friction points and opportunities to improve the experience. It also ensures that every screen has a clear purpose.
Step 3: Create Wireframes
Wireframes are basic layouts that show the structure of a page or screen. They focus on placement, hierarchy, and flow rather than visual styling.
At this stage, designers decide:
- Where navigation should appear
- How content should be organized
- Where calls-to-action should be placed
- What information users need first
- How users move from one screen to another
Wireframes are useful because they allow quick changes without spending too much time on colors, typography, or branding. This keeps the team focused on functionality and usability.
Popular tools for wireframing include Figma, Sketch, Adobe XD, Balsamiq, and Miro.
Step 4: Build an Interactive Prototype
After wireframes are approved, the next step is to create an interactive prototype. This allows users and stakeholders to click through the product and experience the flow before development starts.
A prototype can include:
- Clickable buttons
- Linked screens
- Form interactions
- Navigation menus
- Basic animations
- User flow simulations
The prototype does not need to include every feature. It should focus on the most important user tasks, such as signing up, completing a purchase, booking a service, or submitting a form.
This is where prototyping and user testing become closely connected. The prototype provides something users can interact with, and testing reveals whether the design actually works.
Step 5: Prepare a User Testing Plan
Before testing begins, it is important to create a clear plan. Random testing often leads to unclear results, while a structured testing plan helps teams collect meaningful feedback.
A good user testing plan should include:
- Testing goals
- Target user profile
- Number of participants
- Key tasks users need to complete
- Questions to ask after each task
- Metrics to track
- Testing format, such as remote or in-person
Example testing tasks might include:
- “Create a new account.”
- “Find a product under a specific category.”
- “Book an appointment.”
- “Complete the checkout process.”
- “Update your profile information.”
The goal is to observe how users behave, not to guide them too much. If users struggle, that struggle becomes valuable feedback.
Step 6: Conduct User Testing Sessions
During testing, users interact with the prototype while the team observes their behavior. The facilitator may ask users to think aloud so the team can understand their thought process.
Important things to observe include:
- Where users pause
- Where users click incorrectly
- Which labels or icons confuse them
- Whether they can complete tasks successfully
- How long it takes to complete each task
- What feedback they provide after using the prototype
It is important not to defend the design during testing. The goal is to learn, not to convince users that the design is correct.
Step 7: Analyze Feedback and Find Patterns
After user testing, the team should review all feedback and identify common patterns. One user struggling with something may be a personal preference, but several users facing the same issue usually indicates a usability problem.
Feedback can be organized into categories such as:
- Navigation issues
- Content clarity issues
- Visual hierarchy problems
- Form usability problems
- Accessibility concerns
- Missing information
- Confusing interactions
A practical way to prioritize feedback is to classify issues by severity:
| Severity Level | Description | Recommended Action |
|---|---|---|
| Critical | Prevents users from completing a key task | Fix immediately |
| High | Causes major confusion or delays | Fix before development |
| Medium | Creates minor friction but task is still possible | Improve in the next iteration |
| Low | Small preference or cosmetic issue | Review if time allows |
Step 8: Iterate and Improve the Design
UX design is an iterative process. After analyzing feedback, designers update the prototype and test again if needed.
The cycle usually looks like this:
Research → Design → Prototype → Test → Analyze → Improve → Retest
This loop helps teams move from assumptions to validated design decisions. Each round of testing improves the product and reduces the chances of major usability problems after launch.
Step 9: Finalize the UI Design
Once the core user flow is tested and refined, the design can move into the final UI stage. This is where visual elements become more polished and brand-focused.
Final UI design includes:
- Color palette
- Typography
- Icons
- Buttons
- Spacing
- Visual hierarchy
- Components
- Design system elements
- Responsive layouts
At this point, the design should not only look good but also support usability. A beautiful interface is only successful if users can understand and use it easily.
Step 10: Developer Handoff and Quality Review
The final step is handing the design over to developers. A proper handoff ensures that the approved UX and UI decisions are implemented accurately.
A strong handoff may include:
- Design files
- Style guide
- Component library
- Interaction notes
- Responsive behavior
- User flow documentation
- Accessibility guidelines
- Prototype link
After development, the product should be reviewed again to make sure the final build matches the design and works smoothly across devices.
Statistic Table: Impact of Prototyping and User Testing
| UX Area | Potential Impact |
|---|---|
| Early usability issue detection | Helps identify major problems before development |
| Design iteration speed | Allows faster changes compared to editing coded products |
| Development cost control | Reduces expensive rework during later stages |
| User satisfaction | Improves the chance of creating a smoother and clearer experience |
| Stakeholder communication | Makes product ideas easier to understand through interactive flows |
| Product launch confidence | Helps teams validate important journeys before release |
The Role of a UI UX Design Agency
A professional UI UX Design agency can help businesses move through this workflow with more structure and clarity. Instead of designing based only on assumptions, an agency typically brings research methods, prototyping tools, usability testing experience, and design strategy into one process. This is especially helpful for businesses that want to launch a new product, redesign an existing platform, or improve conversion rates. By using a tested workflow, agencies can help teams create digital products that are visually appealing, easy to use, and aligned with business goals.
About ZeeFrames
ZeeFrames is a design-focused company that helps businesses create user-friendly and visually polished digital experiences. With a strong focus on research, usability, and practical design execution, ZeeFrames supports brands in turning ideas into clear, interactive, and testable product experiences. Their approach to prototyping and user testing helps businesses understand user behavior early, refine product flows, and build interfaces that are easier to navigate. For companies looking to improve their digital presence, ZeeFrames offers a thoughtful approach to UI and UX design that balances creativity with usability.
Best Practices for Prototyping and User Testing
To get the best results from this workflow, keep the following practices in mind:
Test Early, Not Just at the End
Testing should begin before the product is fully designed. Early testing helps catch problems before they become expensive to fix.
Focus on Key User Tasks
Do not test every small detail at once. Start with the most important actions users need to complete.
Use Realistic Content
Placeholder text can sometimes affect test results. Whenever possible, use realistic labels, buttons, and sample content.
Avoid Leading Users
During testing, do not explain too much or guide users toward the correct answer. Let them interact naturally.
Document Everything
Record observations, quotes, task success rates, and repeated issues. Good documentation makes it easier to justify design changes.
Prioritize Feedback Carefully
Not every comment requires a design change. Focus on patterns, usability problems, and issues that affect important user goals.
Common Mistakes to Avoid
Even with a good workflow, teams can make mistakes that reduce the value of prototyping and testing.
Common mistakes include:
- Testing too late in the design process
- Only testing with internal team members
- Asking users what they like instead of watching what they do
- Making the prototype too complex too early
- Ignoring negative feedback
- Prioritizing visual design before solving usability issues
- Testing without clear goals
Avoiding these mistakes can make the overall UX process more effective and reliable.
Frequently Asked Questions
1. What is the main purpose of prototyping in UX design?
The main purpose of prototyping is to test ideas before development. It allows teams to explore layouts, user flows, and interactions in a flexible way.
2. How is user testing different from user research?
User research focuses on understanding users, their needs, and their problems. User testing focuses on evaluating how users interact with a specific design or prototype.
3. When should user testing be done?
User testing should be done early and repeated throughout the design process. It is especially useful after creating wireframes, interactive prototypes, and before final development.
4. Do small businesses need prototyping and user testing?
Yes. Small businesses can benefit greatly because testing helps reduce risk, avoid unnecessary development costs, and create a better experience for customers.
5. What tools are commonly used for prototyping?
Common prototyping tools include Figma, Adobe XD, Sketch, InVision, Axure, and Framer. The best tool depends on the project needs, team workflow, and level of prototype detail required.
Final Thoughts
Prototyping and user testing are not optional extras in modern UX design. They are essential steps for creating products that are practical, intuitive, and user-focused. A structured workflow helps teams move from research to design, from design to testing, and from testing to improvement.
By validating ideas early, businesses can reduce risk, improve usability, and build stronger digital experiences. Whether handled internally or with the support of a UI UX Design agency, this process helps ensure that the final product is not only visually strong but also genuinely useful for the people who use it.
Categorii
Citeste mai mult
When I first heard about the Tyson 15000, I was curious. Could a high-capacity vape really fit into a health-conscious lifestyle? I’ve always tried to balance enjoyment with wellness, and vaping was no exception. With so many options on the market, choosing the right device and flavor makes a big difference in how I approach vaping as part of a daily routine. Why I Consider High-Capacity...

The Bismuth Ingot Price Trend has gained increasing attention from manufacturers, traders, and industrial buyers around the world. As a specialty metal used in pharmaceuticals, cosmetics, alloys, chemicals, and various industrial applications, bismuth plays an important role in several supply chains. Businesses often follow the Bismuth Ingot Price Trend, monitor the Bismuth Ingot Index, and...

Emergen Research is excited to announce the release of its newest series of comprehensive market research reports, tailored to help businesses gain a competitive edge. The reports deliver deep insights into market dynamics, industry developments, and future growth prospects, providing companies with a reliable foundation for strategic decision-making. By highlighting emerging trends and...

According to the latest report published by Data Bridge Market Research, the Biosurgery Market CAGR Value The global biosurgery market size was valued at USD 14.61 billion in 2024 and is expected to reach USD 23.64 billion by 2032, at a CAGR of 6.20% during the forecast period SWOT analysis and Porter’s Five Forces analysis are used...
Termite Control Near Me: Finding Reliable Protection for Your Home Termites are among the most destructive pests that can invade a property. These tiny insects work quietly behind walls, beneath floors, and inside wooden structures, often causing extensive damage before homeowners realize there is a problem. If you have searched for termite control near me, you are likely looking for a...