


How to Apply Refractory Sand on Wax Clusters (Without Wasting Half Your Sand)
Here’s the thing about investment casting: you can have the perfect wax pattern and the best slurry in the world, but if your stuccoing is off, your shell will fail. If you’ve ever dealt with cracked shells or rough surface finishes, you already know the frustration. Figuring out exactly how to apply refractory sand on wax cluster assemblies is where a lot of foundries hit a wall.
We’ve been building equipment for this exact industry since 1986 at Laxminarayan Technologies, and we see the same mistakes pop up on foundry floors all the time. Let’s fix that.
The Basics of Building a Shell
Building a ceramic shell really comes down to three steps. But the devil is in the details.
1. The Slurry Dip You dip the cluster. Simple, right? But if you don’t let the excess drain properly, you get pooling at the bottom of your parts.
2. The Sand Application This is the make-or-break step. You need a completely even coat of dry sand over that wet slurry. Miss a spot, and you get a weak point in the shell.
3. The Drying Phase You hang it up and wait. Rush this, and the shell will almost certainly crack when you pour the metal.
The Problem with Manual Stuccoing
Now, here’s the catch. A lot of shops still rely on manual sand tossing or poorly calibrated, vibrating machines.
What happens? You get uneven coating. You get sand clumping. And worst of all, you spill expensive zircon or mullite sand all over the floor.
We walked into a foundry last year that was losing nearly 30% of their primary refractory sand to spillage and uneven application. That’s money literally being swept into the dustbin at the end of every shift.
The Fix: Controlled Rainfall
Instead of tossing sand or shaking it onto the cluster, you want it to rain.
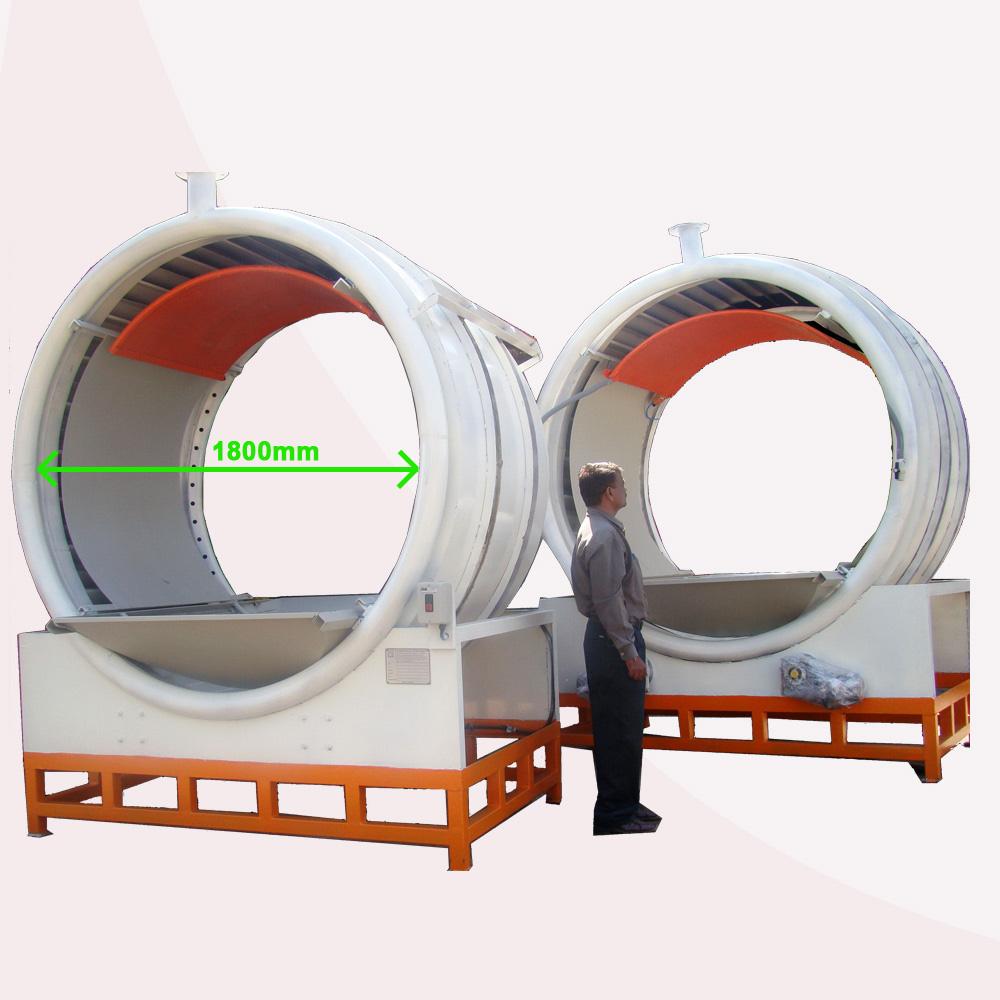
That’s why our team at Laxminarayan Technologies built the RTS1000 Sand Rainer. It doesn’t just dump sand; it creates a perfectly uniform sand rain. You manipulate the wet cluster inside this rain, and the particles stick exactly where they should.
Why this actually matters on your floor:
- Zero vibration: Your operators aren’t fighting a shaking machine all day.
- Minimal spillage: You keep your expensive refractories inside the machine, not on the boots of your workers.
- Automation ready: Whether your team does it manually or you’re running robotic arms, it just works.
- Right sizing: We make them in 1000mm and 1800mm diameters, so it actually fits your floor space.
One client we worked with cut their refractory waste by 40% in the first month just by switching to a controlled rainfall system.
Troubleshooting Common Shell Defects
Even with the right machine, you need to keep an eye on your process. Here are two issues we see constantly:
Problem: Sand clumping on the first coat. Fix: Check your slurry viscosity. If it’s too thick, the sand won’t penetrate. Also, make sure your sand rain is actually uniform, not dumping in heavy clumps.
Problem: Shell peeling during dewaxing. Fix: You probably didn’t let the layers dry completely. Or, your backup coats are too heavy. Build strength gradually with coarser sand.
Ready to Stop Losing Money on Spilled Sand?
Getting the stuccoing process right isn’t about working harder; it’s about controlling the variables.
If you’re tired of sweeping up expensive refractory sand or scrapping parts due to shell defects, it’s time to look at your equipment.
Want to see how the RTS1000 Sand Rainer would fit into your specific setup? [Reach out to our team here] and let’s talk about your floor layout.
Categorie
Leggi tutto
Roofs need to be tough. When storms roll through, they face downpours, thick air moisture, long sun exposure - things that eat away at weak coverings. People often skip expert help until leaks start showing up inside ceilings. Yet, hiring roof specialists around The Woodlands TX means someone already knows how Texas weather wears on shingles and seals. Spotting trouble before it spreads becomes...

Festive Culinary Highlights Get ready for festive culinary action as "Dinner Time Live with David Chang" returns with special holiday episodes. The celebrated chef is known for his authentic approach to cooking demonstrations, revealing the real process behind creating exceptional dishes without the typical television magic of pre-prepared ingredients or behind-the-scenes assistance. The...

Remodeling is one of the most effective ways to improve the comfort, functionality, and value of a property. In a fast-growing and design-driven city like Miami, renovation projects are not only common but often necessary to keep up with modern architectural standards, lifestyle needs, and environmental conditions. Pymesymas provides professional remodeling contractors in Miami designed to help...

The global digital transformation market is experiencing unprecedented growth as organizations worldwide embrace technological advancements to enhance their business operations and customer experiences. The Digital Transformation Market size is projected to grow USD 999.79 Billion by 2035, exhibiting a CAGR of 6.78% during the forecast period 2025-2035. This remarkable expansion is...

Polaris Market Research has published a new report titled Urology Supplements Market Share, Size, Trends, Industry Analysis Report, By Type (Multi-ingredient, Single-ingredient); By Application; By Formulation; By Distribution Channel; By Region; Segment Forecast, 2024 - 2032 that delivers up-to-date analysis with analyses of the current and future effects of the continuously changing industry...