
Sage 50 ODBC Driver Setup: A Complete Guide

Sage 50 ODBC Driver Setup enables users to connect Sage 50 accounting data with third-party applications such as Microsoft Excel, Power BI, Crystal Reports, and other business intelligence tools. By configuring the ODBC (Open Database Connectivity) driver correctly, businesses can generate customized reports, automate data analysis, and improve decision-making without manually exporting company data.
If you're planning to integrate Sage 50 with external reporting or analytics software, this guide explains the ODBC driver setup process, common requirements, and troubleshooting tips.
What Is the Sage 50 ODBC Driver?
The Sage 50 ODBC Driver is a connectivity tool that allows compatible applications to access Sage 50 company data through a secure database connection. Instead of manually exporting reports, users can retrieve financial and operational information directly from Sage 50.
The driver is commonly used for:
- Creating custom financial reports
- Connecting Sage 50 to Microsoft Excel
- Building Power BI dashboards
- Integrating with reporting applications
- Automating data extraction for analysis
Prerequisites Before Setting Up the ODBC Driver
Before configuring the Sage 50 ODBC Driver, verify the following:
- Sage 50 is installed and activated.
- The company file opens without errors.
- You have administrator privileges on Windows.
- The appropriate Sage 50 ODBC Driver version is installed.
- Both Sage 50 and the reporting application use the same architecture (32-bit or 64-bit) whenever required.
- Company data is backed up before making configuration changes.
How to Perform Sage 50 ODBC Driver Setup
Follow these steps to configure the driver:
- Close Sage 50 and any applications currently using the company data.
- Open ODBC Data Sources from the Windows Control Panel.
- Select System DSN or User DSN, depending on your organization's requirements.
- Click Add and choose the Sage 50 ODBC Driver from the available drivers.
- Enter a descriptive Data Source Name (DSN).
- Browse to the Sage 50 company data location if prompted.
- Enter the required login credentials.
- Test the connection to confirm successful communication.
- Save the configuration and close the ODBC Administrator.
- Launch your reporting or analytics application and connect using the newly created DSN.
Once configured, supported applications can retrieve Sage 50 data directly through the established connection.
Common ODBC Driver Setup Issues
Users may encounter several issues during configuration, including:
- Sage 50 ODBC Driver not appearing in the driver list
- DSN connection failures
- Authentication errors
- Invalid company file path
- Driver version incompatibility
- 32-bit and 64-bit application mismatch
- Windows permission restrictions
- Network connectivity issues for shared company files
Most of these problems can be resolved by reinstalling the correct driver, verifying permissions, or recreating the DSN configuration.
Tips for a Successful Setup
To maintain a stable ODBC connection:
- Keep Sage 50 updated to the latest supported version.
- Use the correct driver version for your installation.
- Avoid moving company files after creating the DSN.
- Grant users appropriate access permissions.
- Regularly back up company data.
- Test the connection after Windows or Sage updates.
- Document DSN settings for future maintenance.
Conclusion
A properly completed Sage 50 ODBC Driver Setup simplifies data reporting and allows businesses to integrate Sage 50 with powerful analytics and reporting tools. Whether you're building dashboards, creating custom reports, or automating financial analysis, a correctly configured ODBC connection improves efficiency while reducing manual work.
If you experience connection errors, driver compatibility issues, or setup difficulties, professional Sage 50 support can help diagnose the problem, configure the driver correctly, and ensure secure access to your accounting data.
Categorie
Leggi tutto
The modern digital era has created immense pressure for companies to adopt strong marketing tactics that help them create visibility and optimize their search engine rankings and audience engagement. Effective press release distribution, coupled with SEO best practices, helps business owners boost their presence online. Guestpostsale.com offers professional press release distribution services...

Kerry Carpenter contains been inside a beautiful tough location this after a relatively Excellent, still back again problems plagued 2025 year, the Tigers' instantly fielder and specified hitter arrived into camp hunting towards area alongside one another a further more regular 202and ideally ultimately banish the back again and hamstring damage that include nagged at him for a great deal of...

According to the latest report published by Data Bridge Market Research, the Venipuncture Procedure Analysis Market CAGR Value The global venipuncture procedure analysis market size was valued at USD 1.41 billion in 2025 and is expected to reach USD 2.44 billion by 2033, at a CAGR of 7.10% during the forecast period Venipuncture...
One Piece Season 2 Overview Embark on a new voyage with the Straw Hat crew as they navigate the adventurous waters of One Piece Season 2. Prepare to explore the vast and mysterious Grand Line through an immersive experience that goes beyond the screen. Introducing the official companion podcast, a must-listen for fans eager to delve deeper into the live-action series’ second chapter,...

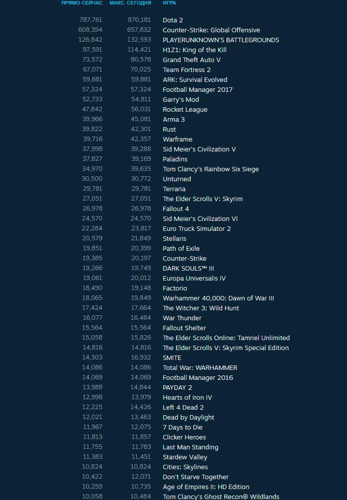
На протяжении уже шести недель подряд лидирующие позиции в цифровом магазине Steam удерживает шутер PlayerUnknown's Battlegrounds. По данным сервиса SteamSpy, число его владельцев приближается к 1 652 749 человек, а за последнюю неделю было продано около 280 255 копий. Второе место занимает психологический хоррор Outlast 2, который продолжает оставаться популярным среди игроков. Стратегия...