How to Export and Prepare Models in Prusa Slicer
Prusa Slicer has become an essential tool for both novice and professional 3D printing enthusiasts. Its intuitive interface, combined with powerful features, allows users to take 3D models from design to finished print with ease. Understanding how to export and prepare models in Prusa Slicer is critical to ensure high-quality prints, minimize errors, and optimize the printing process. In this article, we will explore the essential steps, tips, and best practices for effectively preparing your 3D models in Prusa Slicer.
Importing 3D Models into Prusa Slicer
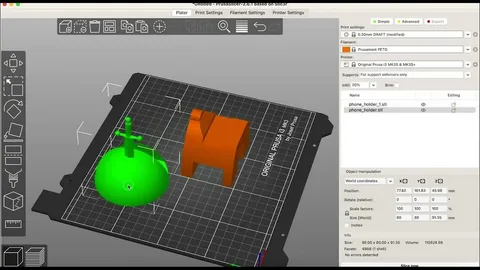
The first step in the 3D printing workflow is importing your model into Prusa Slicer. The software supports a wide range of file formats, including STL, OBJ, and 3MF, which makes it compatible with most 3D modeling programs. To import a model, open Prusa Slicer, click on the “Add” button, and select the file from your computer. Once imported, the model appears on the virtual print bed, where you can view its orientation and scale.
Properly positioning your model on the print bed is essential. Prusa Slicer provides tools to rotate, move, and scale the model to fit your printer’s build volume. Positioning the model correctly can prevent print failures, reduce the need for supports, and optimize print quality. Additionally, the software allows for duplication and arrangement of multiple models on the print bed, helping users maximize efficiency when printing several items at once.
Adjusting Print Settings for Optimal Results
After importing your model, the next step is configuring print settings. Prusa Slicer offers a range of preset profiles for different printers and filament types, which can be a great starting point for beginners. These settings include layer height, infill density, print speed, and nozzle temperature. Adjusting these parameters ensures that your 3D prints are both precise and structurally sound. For instance, a lower layer height results in smoother surfaces, while higher infill increases the object’s durability.
Moreover, advanced users can tweak support structures, cooling settings, and retraction options to minimize print defects. Supports are critical for overhangs or complex geometries, and Prusa Slicer automatically generates them based on your model’s orientation. By fine-tuning these settings, users can significantly reduce material waste, prevent stringing, and achieve consistent print quality. Knowing how to customize print settings is key to mastering Prusa Slicer.
Slicing the Model
Slicing is the process of converting your 3D model into instructions that a 3D printer can understand. In Prusa Slicer, this involves generating G-code, which controls the printer’s movements, temperature, and extrusion. Once your model is positioned and print settings are configured, clicking the “Slice Now” button begins this process. The software then provides a preview of the toolpaths, showing how each layer will be printed.
The slicing preview is essential for detecting potential issues before printing. Prusa Slicer allows users to inspect layers, infill patterns, and support structures in detail. This step is particularly useful for identifying weak points, gaps, or overhangs that may require additional supports or adjustments. Reviewing the sliced model ensures a smoother printing experience and minimizes the risk of failed prints, saving both time and filament.
Exporting G-Code for Printing
Once the slicing process is complete, the next step is exporting the G-code. Prusa Slicer provides multiple options for exporting files, including saving directly to an SD card or USB drive. The G-code contains all the instructions your 3D printer needs, including movements, extrusion rates, and temperature settings. Choosing the correct export method is important to ensure compatibility with your specific 3D printer model.
Before sending the file to your printer, double-check the export settings. Prusa Slicer allows users to select printer-specific profiles and filament types to ensure accurate printing. For printers with network connectivity, you can also upload the G-code directly using Prusa Connect. By carefully managing the export process, users can prevent common printing errors and ensure that the final print matches the intended design.
Post-Processing and Preparing for Printing
Even after exporting the G-code, preparing your model for printing does not end. Proper printer preparation, such as leveling the bed, cleaning the nozzle, and loading filament, is crucial for a successful print. Prusa Slicer helps by providing detailed instructions and visual aids to align your printer settings with the sliced model. Ensuring that the printer is properly calibrated minimizes print failures and enhances the quality of your final model.
Additionally, some models may benefit from post-processing in Prusa Slicer, such as adding custom supports or splitting complex designs into multiple parts. The software also supports modifiers to vary infill or layer height in specific sections of the model, which can improve strength or reduce material usage. By combining careful printer preparation with advanced slicing options, users can achieve professional-quality prints with minimal trial and error.
Conclusion
Mastering how to export and prepare models in Prusa Slicer is an essential skill for any 3D printing enthusiast. From importing and positioning models to adjusting settings, slicing, and exporting G-code, each step plays a crucial role in achieving high-quality prints. By leveraging the advanced features of Prusa Slicer, users can optimize their workflow, reduce material waste, and produce consistent, reliable 3D prints.
Whether you are a beginner just starting out or an experienced maker, understanding these steps will improve your 3D printing experience and help you get the most out of your printer. With practice and attention to detail, Prusa Slicer becomes not just a tool but a powerful companion in bringing your 3D models to life.
Κατηγορίες
Διαβάζω περισσότερα
"Executive Summary: Multi-Med Adherence Packaging Market Size and Share by Application & Industry The global multi-med adherence packaging market size was valued at USD 427.56 million in 2024 and is expected to reach USD 691.82 million by 2032, at a CAGR of 6.2% during the forecast period A worldwide Multi-Med Adherence Packaging Market...
If you’ve been playing Grow A Garden for a while, you probably know that collecting rare pets can be a game-changer. Among them, the Spriggan is one of the most sought-after creatures, thanks to its unique abilities and charming design. Unlocking it might seem tricky at first, but with a few strategies, you can get your hands on one much faster than you might think. What Makes Spriggan...

Benefits of Using Certification Exam Preparation Material Certification exams help people grow in their careers. They help you get better jobs. They also help you earn more money. Many students want to pass the OMG-OCUP-300 exam on the first attempt. This exam is offered by OMG. However, exam preparation can feel difficult. There are many books to read and many topics to cover. This is why...

We present a comprehensive and authoritative guide to the Qatar Airways Manila Office, designed to support travelers, corporate partners, and aviation stakeholders seeking reliable, detailed, and up-to-date information. Qatar Airways, consistently recognized as one of the world’s leading airlines, maintains a strong operational and customer service presence in the Philippines through its...

➡️ Go To My Site : https://www.elitesomya.com/ Booking Number : Whatsapp Elitesomya Hyderabad Escorts for specific experiences for you Hyderabad Escorts provide men with an opportunity to indulge in sensual pleasures. These professionals serve their customers and in return receive compensation; thus allowing them to earn a sustainable livelihood. The top offer an...