


The Ultimate Guide to Object Removal Photo Editing: How Clean Photos Help Properties Sell Faster
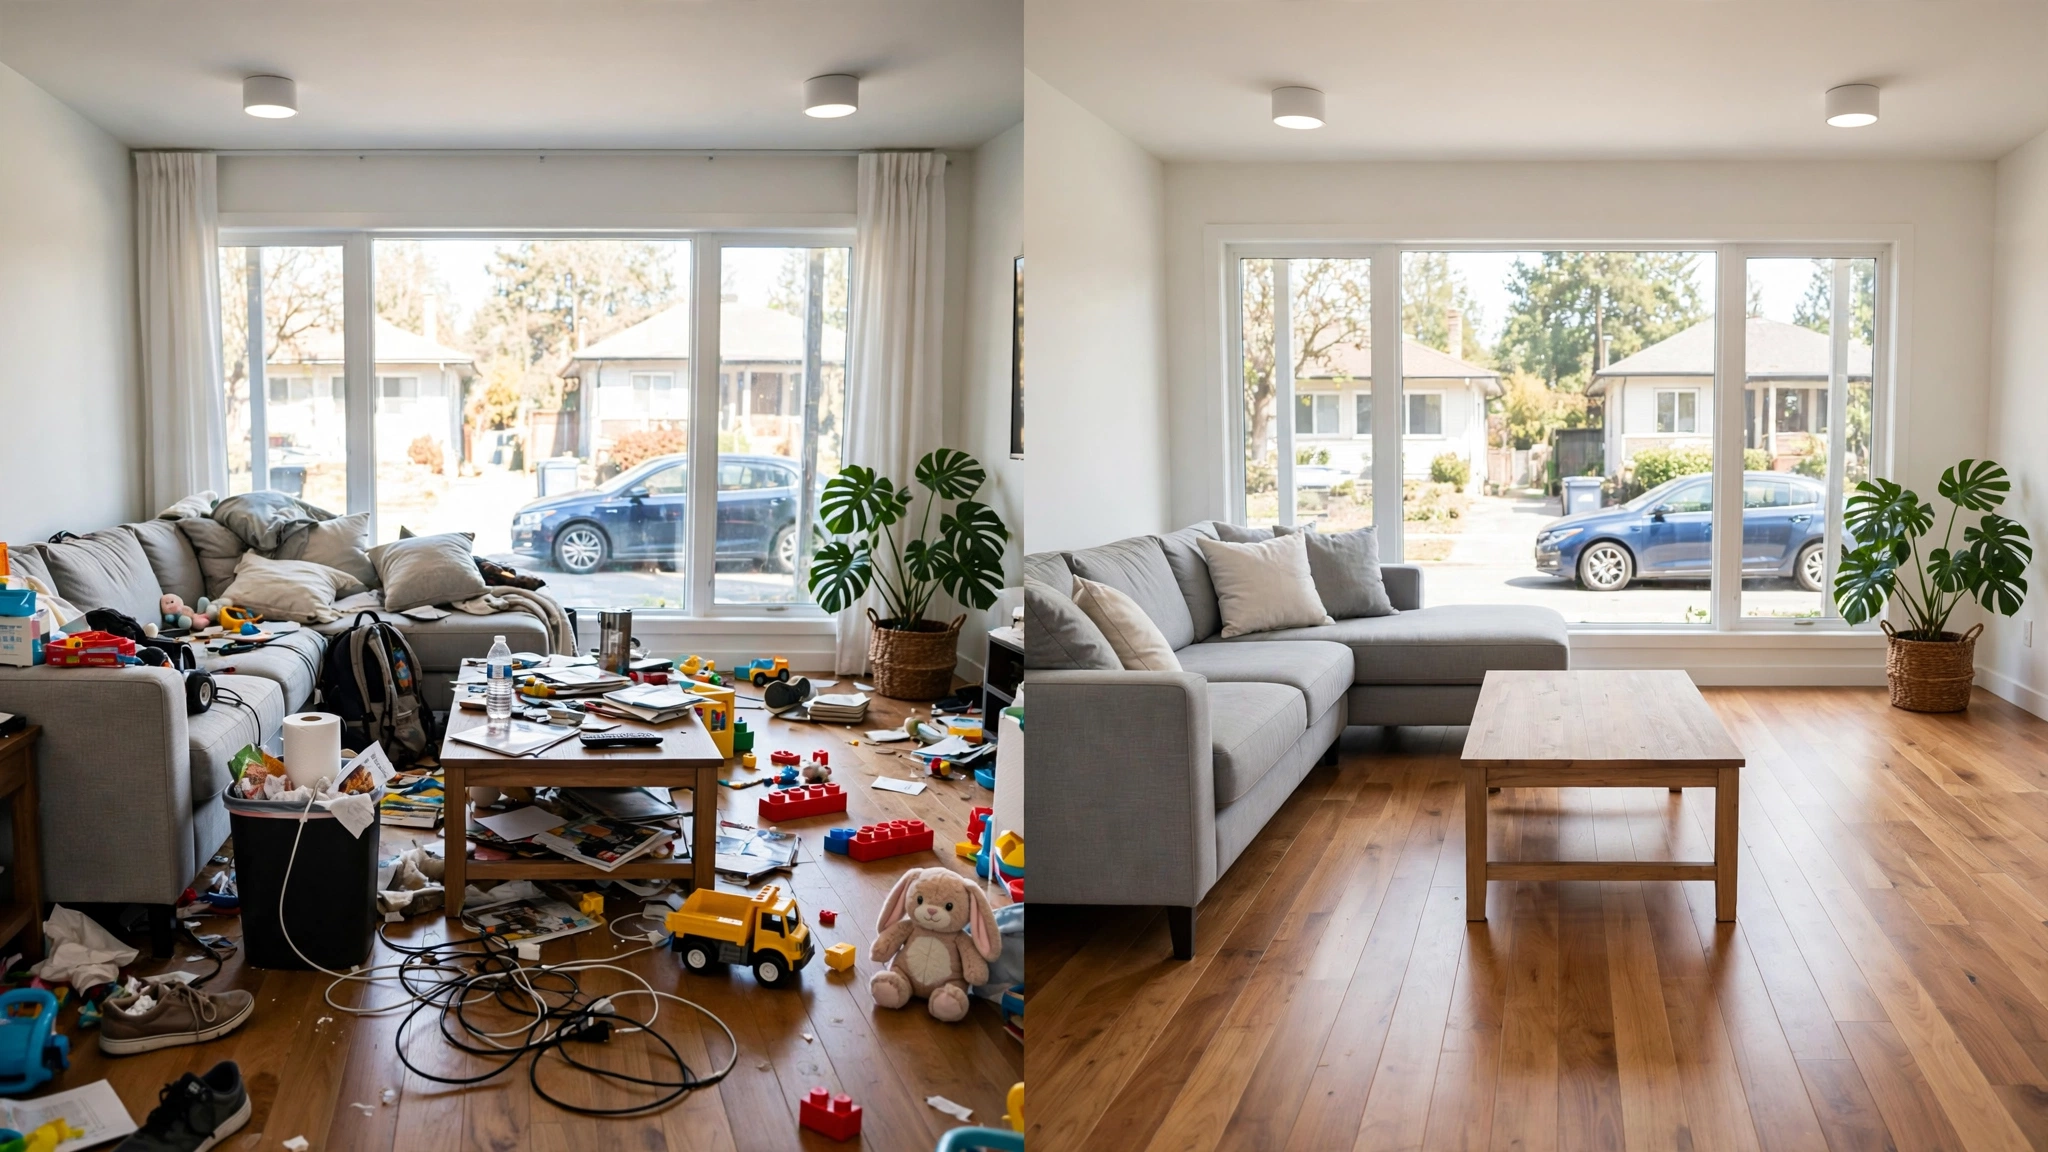
A great photo doesn't just show a space. It sells a feeling. And sometimes, that feeling is ruined by one small thing you didn't notice when you pressed the shutter.
A trash bin left on the curb. A neighbor's car parked halfway in the driveway. A power cord snaking across a perfect hardwood floor. A gardener's hose, a pile of shoes by the door, a reflection of the photographer in the bathroom mirror.
You had the light right, the angle was perfect, but that one object pulls all the attention. This is exactly where object removal photo editing comes in.
It's not about faking a property. It's about removing distractions so buyers can see what actually matters.
What is Object Removal Photo Editing?
Object removal photo editing is exactly what it sounds like, but done with a lot more care than hitting delete. It's the process of erasing unwanted elements from an image and then reconstructing the background behind them so seamlessly that no one can tell anything was ever there.
Think of it as digital decluttering.
Unlike simple cropping or blurring, true object removal involves rebuilding. If you remove a car from a driveway, you have to recreate the concrete texture, the tiny cracks, the fallen leaves, and the way the light falls on that spot. If you remove a person from the background of a living room photo, you have to rebuild the sofa cushion, the wall paint, and the shadow.
When it's done poorly, you get a smudgy, blurry patch that looks worse than the original object. When it's done well, the photo just feels... clean. Calm. Professional.
There are two types of object removal that most photographers deal with:
1. Temporary, movable objects. These are things that don't belong to the property. Trash cans, cars, toys in the yard, construction debris, cleaning supplies, pet bowls, personal photos on the wall, extension cords. These are 100% ethical to remove because they are not part of what the buyer is purchasing.
2. Permanent but distracting elements. This is where you have to be careful. Things like power lines in front of a beautiful exterior, a crack in a driveway, stains on a wall, reflections, harsh shadows from your flash. These can be removed or softened, but you should never remove something that materially changes the property, like removing a telephone pole that holds up the structure, or erasing damage you are legally required to disclose. Clean up, don't cover up.
For real estate, the first category is where object removal delivers 90% of its value.
Why Your Brain Hates Cluttered Photos
There's actual psychology behind this. When a potential buyer scrolls through listings, they are making snap judgments in less than three seconds per photo.
A cluttered image increases what psychologists call cognitive load. The brain has to work harder to understand the space. Where does the kitchen end and the dining start? Is that stain permanent? Why is there a ladder in the bedroom?
Every unwanted object asks a question that pulls the viewer away from the main story: "Could I live here?"
A clean image, on the other hand, does something powerful. It creates space for imagination. When you remove the current owner's laundry basket, their kid's toys, and the extra furniture, you aren't creating an empty room. You are creating a blank canvas. The buyer can suddenly see their own sofa, their own life.
Studies on property listings consistently show the same thing: listings with clean, bright, decluttered photos get more clicks, more saves, and more showings. And more showings lead to faster sales. In a market like real estate, where days on market directly affect the final price, that visual clarity is not a luxury. It's a business tool.
That is why knowing how to remove unwanted objects from property photos has become a core skill for every serious agent, photographer, and Airbnb host.
The Most Common Objects We Remove From Real Estate Photos
If you shoot properties regularly, this list will feel very familiar. These are the things that end up on the cutting room floor almost every single day.
Outside the house:
Cars parked in the driveway or on the street in front of the house. This is number one. If you want to show a home's curb appeal, you don't want a dusty SUV blocking half of it. We often get requests to remove cars from driveway in real estate pictures to restore that clean front view.
Trash bins and recycling cans left out on collection day. Garden hoses, sprinklers, and yard tools. "For Sale" signs from the previous agent, or even your own sign's shadow. Political signs or neighbor's signs that shouldn't be in your listing. Construction materials on new builds. Fallen branches, weeds, or dead patches in the lawn.
And power lines. If there is one request that defines exterior retouching, it's to erase power lines from exterior home photos. They crisscross a beautiful blue sky and instantly make a photo feel messy.
Inside the house:
Cords and cables. Phone chargers, TV cables, extension cords. Reflections in mirrors, windows, and TVs, especially the photographer themselves. Light switches and outlet covers that look dirty or yellowed. Personal photos, religious items, and refrigerator magnets. Clutter on countertops, open toilet lids, soap bottles, and bath mats that look tired.
Ceiling fans that create weird shadows. Pets caught mid-frame. And people. You always need to know how to remove people from background of listing photos, whether it's a homeowner who walked into the shot or a neighbor visible through a window.
For Airbnb and vacation rentals:
This is a world of its own. Hosts need to clean up clutter in house photos for selling a stay, not just a house. That means removing personal toiletries, half-used shampoo bottles, cleaning supplies, extra keys, tangled bed sheets, or that one chair everyone dumps clothes on.
How Object Removal Actually Works: The Tools and Techniques
There is no magic button, even if Instagram makes it look like there is. Good removal is a combination of several tools used in the right order.
1. Content-Aware Fill and Patch Tools
This is the starting point in Photoshop. You select the object, and Photoshop looks at the surrounding pixels to guess what should be behind it. For small objects on a simple background, like a switch on a white wall, this works great. For complex textures like grass or a brick wall, it often leaves a repeating pattern that looks fake if you don't fix it manually.
2. Clone Stamp and Healing Brush
This is the craft. The Clone Stamp copies pixels from one area to another. The Healing Brush copies texture but blends color and light. A skilled retoucher will spend most of their time with these two tools, sampling clean concrete to rebuild a driveway after removing a car, or sampling wood grain to rebuild a floor after removing a cord. It's slow, manual work.
3. Frequency Separation
This is a pro technique for hard removals. It separates texture from color. So if you need to remove a stain on a wall but keep the wall's subtle plaster texture, you can work on the color without destroying the texture. This is what separates a natural result from a plastic-looking one.
4. Perspective and Shadow Rebuilding
This is what beginners miss. When you remove a trash bin sitting on a driveway, you don't just remove the bin. You have to remove its shadow too, and then recreate the texture of the driveway where the shadow was, with the correct light gradient. If you leave the shadow, the brain knows something is missing. If you remove it incorrectly, the lighting feels off.
5. AI Tools
Tools like Lightroom's Remove Tool, Photoshop's Generative Fill, and Luminar have gotten incredibly good in the last year. They are fantastic for quick cleanups. You can circle a trash can and it's gone. But for real estate, where you need straight lines to stay straight and repeating patterns like tiles or roof shingles to stay perfect, AI alone still needs human supervision. AI will often warp a tile line or create a window that was never there.
The best workflow today is hybrid: AI for the first 80% of the removal, human retouching for the final 20% where precision matters.
A Real-World Workflow: How to Remove Trash Bins from Real Estate Listing Photos
Let me walk you through how a professional would actually handle a very common request: a big green trash bin ruining an otherwise perfect front yard shot.
Step one is not editing. It's assessment. You zoom in at 100% and ask: What is behind the bin? Is it grass, a fence, concrete, and a bit of the garage door? How is the light falling? Where are the shadows?
Step two is rough removal. Using the Lasso tool, you select the bin with a little padding and use Generative Fill or Content-Aware Fill to get rid of the bulk of it.
Step three is where the real work starts. You will likely have a messy patch where the bottom of the bin met the grass. You switch to the Clone Stamp at low opacity, maybe 30-40%, and start sampling clean grass from nearby areas. You don't clone from one spot over and over, because that creates a repeating pattern. You sample from many different spots, changing the brush size constantly.
Step four is line correction. If the bin was in front of the driveway edge, you need to rebuild that straight concrete line. You use the Pen tool or a hard Clone Stamp with perspective in mind. You follow the existing line, keeping it perfectly straight.
Step five is shadow and light matching. The bin cast a shadow on the grass. You need to remove that dark patch and bring back the natural brightness of the grass, matching the grain and noise of the rest of the image.
Step six is final check. You zoom out, then you zoom back in at 200%. You look at the noise. Does the rebuilt area have the same amount of grain as the rest of the photo? Does the color match? If you shot in RAW, you add a tiny bit of grain to the whole image to unify it.
Total time for one good removal: 5 to 15 minutes. For a batch of 30 photos with 10 removals, you're looking at hours. Which is why busy photographers outsource it.
DIY vs. Professional: When Should You Do It Yourself?
If you are a photographer who shoots two houses a week and you enjoy editing, you can absolutely handle basic removals. A power cord here, a reflection there. Lightroom Mobile can now remove small objects on your phone in seconds.
You should do it yourself when:
The object is small and on a simple background.
You have time and you are only editing a few photos.
It's a personal project or a low-budget rental.
You should use a professional object removal service for realtors and photographers when:
You have a full listing of 25-40 photos that all need cleaning.
The object sits on a complex texture like a patterned rug, tiled backsplash, or landscaping.
You need to maintain straight verticals and architectural accuracy.
You need consistency. If you remove a car from one exterior photo but leave it in the next photo shot from a different angle, the listing looks inconsistent.
You are listing a high-value property where a sloppy edit could cost you trust.
Time is the real cost here. If your hourly rate as a photographer is $150, and you spend 3 hours removing clutter from a listing, you just spent $450 of your own time on something you could have outsourced for a fraction of that.
Why Smart Agents Invest in Professional Object Removal
The best agents don't see photo editing as an expense. They see it as staging.
Physical staging a home costs $2,000 to $5,000. Virtual staging costs a few hundred. Object removal costs even less, and it has the highest ROI because it fixes the photos you already paid for.
Here's what professional object removal gives you:
Faster sales. Clean Airbnb photos get booked faster, and clean listing photos get more showings. When you clean up clutter in house photos for selling, buyers linger longer on the gallery. Longer engagement tells the portals like Zillow and Realtor.com to rank your listing higher.
Higher perceived value. A driveway without oil stains and without cars looks bigger and newer. A kitchen counter without appliances looks more spacious. People don't just buy square footage, they buy the feeling of space.
Brand consistency. If you are an agent or brokerage, every listing is an ad for your brand. Blurry, cluttered photos with bins and cords say "I rushed this." Crisp, clean photos say "I take my clients' homes seriously."
Legal peace of mind. A good professional editor knows the line. They will remove a temporary trash can but will refuse to remove a permanent crack in the foundation that should be disclosed. That ethical filter protects you.
Where PixelShouters Fits In
I want to talk about this practically. When we built PixelShouters, we didn't start as a generic editing company that does everything from wedding photos to product shots. We started by only doing real estate.
That focus matters for object removal.
A generalist editor might remove a car and accidentally bend the garage line. Or they might remove a toilet cleaner and leave a weird smudge that a buyer notices. Because we edit thousands of real estate photos every week, our retouchers know what a real driveway texture looks like, how a lawn should fall off into shadow, how to keep brick patterns aligned.
At PixelShouters, object removal is part of our standard real estate photo editing workflow, not an expensive add-on. When you send us a set, we automatically check for the usual distractions, cars, bins, hoses, cords, reflections. If you have specific requests like "please remove the neighbor's dog in image 7" or "can you clean the front yard for this exterior," we handle that within the same turnaround.
For agents who need object removal for Airbnb photos or a quick turnaround before a listing goes live, we offer same-day delivery. You upload your photos in the evening, and by morning you have clean, listing-ready images that still look 100% natural.
We don't over-edit. Our rule is simple: If a buyer would see it differently in person and feel misled, we don't remove it. We clean the photo so it shows the property at its best on a good day, not a fantasy version.
That's the difference between a filter and a professional service. One just erases. The other understands real estate.
7 Mistakes That Make Object Removal Look Fake
Even with great tools, these mistakes will ruin your image:
1. Ignoring the shadow. You removed the object but left its shadow. Now it looks like a ghost object is floating. Always remove or rebuild the shadow area.
2. Repeating patterns. You cloned the same patch of grass five times. The human eye is incredible at spotting repetition. Always resample from different areas.
3. Breaking straight lines. In real estate, lines are everything. Window frames, tile grout, countertop edges, roof lines must stay perfectly straight. One wavy line screams "Photoshopped."
4. Over-smoothing. You removed a stain from a wall but also removed the wall's texture. Now you have a plastic-looking circle in the middle of a textured wall. Keep the grain.
5. Color mismatch. The rebuilt area is slightly warmer or cooler than the surroundings. This happens a lot with sky replacements after removing power lines. Check your white balance on the rebuilt area.
6. Forgetting reflections. You removed a person from a window, but their reflection is still visible in the glass door next to it.
7. Inconsistency across the set. You removed the cars from the front exterior but left them in the shot taken from the driveway looking out. Viewers notice.
Beyond Real Estate: Where Else This Skill Pays Off
While we live and breathe property photos, the same technique is used everywhere:
E-commerce brands remove dust, scratches, and mannequin stands. Car dealerships remove license plates, reflections, and background clutter from lot photos. Portrait photographers remove blemishes, flyaway hairs, and background distractions. Even in landscape photography, people remove tourists from crowded landmarks.
But real estate has the strictest requirement: it has to stay believable. You can get away with a fantasy sky in a travel photo. You cannot get away with a warped wall in a listing photo.
The Future of Object Removal
Generative AI has changed the game in the last 12 months. What used to take 10 minutes now takes 10 seconds for the first pass. Adobe, Skylum, and even your phone can now remove large objects with shocking accuracy.
But for professional work, especially for things like professional object removal service for realtors where accuracy matters, the future is not AI vs. human. It's AI plus human.
AI will do the heavy lifting, the initial fill, the texture guess. A human retoucher will do the quality control, fix the perspective, match the noise, and ensure the edit is ethical and consistent with the rest of the set.
The tools will get faster. The standard for what looks "clean" will get higher. Buyers will expect every listing to look decluttered, because they've been trained by the best listings.
Final Checklist Before You Deliver or Publish
Before you upload your final photos to the MLS or Airbnb, run through this quick list:
Did you remove all temporary clutter, bins, cars, hoses, cords, personal items?
Did you check all mirrors and windows for reflections of people or flash?
Did you remove shadows left by removed objects?
Did you zoom in to 100% and check for repeating patterns or smudges?
Are straight lines still straight?
Does the set feel consistent from photo to photo?
Would you feel comfortable showing this photo to a buyer and then showing them the home in person?
If yes, you are ready.
Object removal photo editing isn't about tricking anyone. It's about respect. Respect for the property, for the viewer's time, and for the story you're trying to tell.
A clean photo lets the home speak for itself. No trash bins, no distractions, just space, light, and possibility.
If you are spending hours doing this yourself or you are not happy with how your current edits are turning out, consider outsourcing it. At PixelShouters, we handle object removal every day for agents, photographers, and Airbnb hosts who want their listings to look their best without spending their nights in Photoshop.
Upload a few test images and see the difference. Sometimes removing one small object is what finally makes the whole house shine.
Frequently Asked Questions
How much does object removal cost for real estate photos?
For simple removals like cords or small clutter, it is usually included in standard editing packages. For complex removals like removing a car or rebuilding a driveway, most services including PixelShouters charge a small per-image fee, typically $0.50 to $3 depending on complexity.
Is it legal to remove objects from listing photos?
Yes, as long as you remove temporary, movable objects that are not part of the property sale. You should not remove permanent defects, structural issues, or anything that would mislead a buyer about the condition or location of the home. When in doubt, disclose.
Can I remove cars from my driveway photos?
Absolutely. This is one of the most common and accepted edits. Removing cars helps show the full driveway and curb appeal.
How long does it take?
With AI-assisted tools, a simple removal takes 1-3 minutes. A complex removal takes 10-15 minutes. Professional services usually deliver a full batch of 30 edited photos within 12-24 hours.
What's the difference between object removal and virtual staging?
Object removal cleans what is already there. Virtual staging adds new furniture to an empty room. Most listings need both: removal first to clean the space, then staging to show its potential.
Catégories
Lire la suite
" According to the latest report published by Data Bridge Market Research, the Micro-Needling Unit Market The global micro-needling unit market size was valued at USD 824.43 million in 2025 and is expected to reach USD 1,702.74 million by 2033, at a CAGR of 9.49% during the forecast period. Winning Micro-Needling Unit Marketresearch report deeply analyses the potential of the...

Plumbing issues rarely occur at a convenient time. A burst pipe may surprise you in the middle of the night, a clogged drain might disrupt your home during a family gathering, and hidden leaks can silently damage your property until the problem becomes too big to ignore. When you’re facing urgent water-related problems, having a dependable plumbing partner becomes essential. This is where...

Book Tirupati to Bangalore Cab with Cabbazar for safe, reliable & affordable taxi rides with professional drivers and quick booking. Fare starts Rs 9

Managing a chronic condition often requires consistent, long-term medical treatment, which can be physically and emotionally demanding for patients and their families. As healthcare models evolve, Injection at Home in Dubai has become a practical solution for individuals who need regular injections without the stress of frequent clinic visits. This approach blends medical professionalism with...

" According to the latest report published by Data Bridge Market Research, the Bancassurance Market The global bancassurance market size was valued at USD 1506.54 billion in 2024 and is expected to reach USD 2312.06 billion by 2032, at a CAGR of 5.50% during the forecast period The supreme Bancassurance Market research report has been built by skilful and...