


Must-Have Cleaning Supplies Before Attempting Carpet Repairs
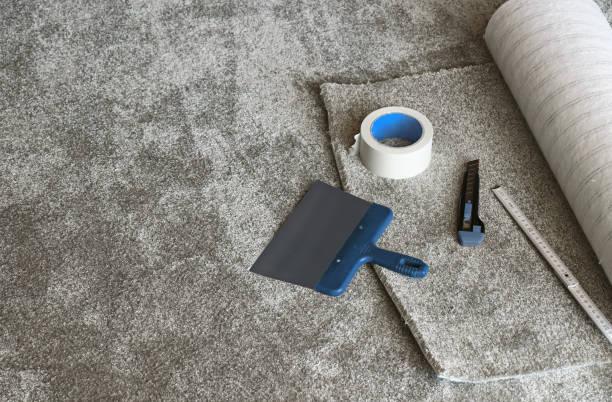
Carpet repair is one of those home improvement tasks that looks deceptively straightforward from the outside. Watch a few videos, grab a utility knife and some seam tape, and you might feel ready to dive straight in. The reality, however, is that the success or failure of a carpet repair job is often determined well before the actual repair begins — specifically, in how thoroughly and correctly the affected area has been cleaned and prepared. For homeowners across Melbourne's south-eastern suburbs, skipping the preparation stage is the single most common reason a DIY repair falls short of expectations, and it is precisely why experienced professionals offering Carpet Repair Cranbourne North services always begin every job with a thorough, systematic cleaning process before a single tool is picked up.
Why Cleaning Before Repair Is Non-Negotiable
It is tempting to treat carpet cleaning and carpet repair as two separate tasks — clean it later, fix it now. But the two are fundamentally linked, and the order matters enormously.
Attempting to repair a carpet that has not been properly cleaned first introduces a range of problems. Adhesives fail to bond correctly when applied over dirty or damp fibres. Patches installed over contaminated backing materials trap bacteria and odours beneath the surface permanently. Seams sealed over debris or residue are more likely to lift, bubble, or fray within months rather than years. And dye-based stain treatments applied after rather than before a structural repair can bleed into freshly joined seams and create discolouration that is impossible to reverse.
Cleaning first is not just good practice — it is the foundation on which a durable, professional-quality repair is built.
1. A High-Quality Carpet Stain Remover
The first item on your supply list should be a reliable, carpet-safe stain remover. Not all stain removers are created equal, and choosing the wrong one for the type of stain you are dealing with can set the stain more permanently or damage carpet fibres before the repair has even begun.
For organic stains — pet urine, food, blood, and vomit — an enzyme-based stain remover is the most effective choice. Enzyme cleaners break down the organic compounds at a molecular level rather than simply masking them, which means the stain and its associated odour are genuinely neutralised rather than temporarily suppressed.
For synthetic stains such as ink, paint, or adhesive residue, a solvent-based spotter is more appropriate. Always spot-test any stain remover on an inconspicuous area of carpet first, particularly on wool or wool-blend carpets, which can be sensitive to certain chemical formulations.
Allow the stain remover adequate dwell time — typically five to ten minutes — before blotting. Never rub a stain, as this drives it deeper into the pile and spreads the affected area. Always blot from the outside of the stain inward to prevent spreading.
2. White Microfibre Cloths and Blotting Towels
White microfibre cloths are a non-negotiable addition to your cleaning kit, and the emphasis on white is deliberate. Coloured cloths risk transferring dye onto wet carpet fibres, which can create a secondary stain on top of the one you are trying to remove.
Microfibre is the preferred material because its fine fibres absorb moisture and lift dirt particles more effectively than cotton or paper towels. When blotting a stain, use firm downward pressure rather than a rubbing motion, and rotate to a clean section of the cloth frequently to avoid re-depositing what you have already lifted.
Have at least six to eight cloths available before beginning — you will go through them faster than expected, particularly when dealing with large or deeply set stains.
3. A Carpet Cleaning Brush or Grooming Brush
A stiff-bristled carpet brush serves two important purposes in the pre-repair process. First, it helps work cleaning solutions deeper into the pile for more effective stain treatment. Second, it is used after cleaning and drying to restore the natural lay and direction of carpet fibres before the repair is assessed and executed.
Pile direction matters enormously in carpet repair. When fibres are matted, tangled, or lying in inconsistent directions due to foot traffic or cleaning activity, it becomes extremely difficult to accurately assess the extent of damage, cut clean edges for a patch, or ensure that a repaired seam lies flat and invisible.
A carpet grooming brush — sometimes called a pile lifter — is a softer alternative specifically designed to revive crushed or flattened fibres. Using this tool after cleaning and before repair ensures you are working with carpet that is in its natural, restored state rather than a compressed, post-cleaning approximation of it.
4. A Wet and Dry Vacuum Cleaner
A standard household vacuum is adequate for general maintenance, but when preparing a carpet for repair, a wet and dry vacuum is a significantly more useful tool. Its ability to extract moisture from carpet fibres after cleaning is one of the most important steps in the pre-repair process and one that is consistently underestimated.
Carpet that retains moisture beneath the surface — even when it feels dry to the touch on top — creates serious problems for adhesives, seam tapes, and patch bonding. Sub-surface moisture prevents heat-activated tapes from bonding correctly and can cause freshly installed patches to lift within days.
A wet and dry vacuum used in extraction mode pulls moisture from deep within the pile and backing, dramatically accelerating drying time and ensuring the carpet is genuinely dry rather than superficially so. For larger areas, a professional-grade carpet extractor is even more effective, and these are widely available for hire from equipment rental outlets across Australia.
5. Carpet Pre-Spray or Pre-Treatment Solution
For areas with heavy soiling, embedded dirt, or old set-in stains, a carpet pre-spray applied before primary cleaning significantly improves outcomes. Pre-sprays work by breaking down grease, oils, and ground-in debris at a chemical level, making them far easier to lift during the subsequent cleaning process.
Apply the pre-spray evenly across the affected area, allow it to dwell for the manufacturer's recommended time — typically five to fifteen minutes — and then agitate gently with a brush before extracting. Do not over-saturate the carpet, as excessive moisture is one of the most common causes of backing damage and mould growth beneath carpet during the repair process.
6. Odour Neutraliser or Enzyme Deodoriser
If the carpet damage is associated with pet accidents, mould, or any form of organic contamination, odour neutralisation is an essential step that must happen before the repair is completed — not after. Sealing odour-contaminated carpet beneath a patch or along a freshly bonded seam traps the smell permanently and creates a far more difficult remediation challenge down the track.
Enzyme-based deodorisers are the gold standard for organic odour elimination. Unlike fragrance-based products that simply mask smells, enzyme deodorisers break down the odour-causing compounds themselves, producing a genuinely neutral result rather than a perfumed cover-up.
Apply the deodoriser generously, allow full dwell time, and extract thoroughly before proceeding. In cases of severe contamination — such as long-standing pet urine that has penetrated through to the underlay — professional cleaning prior to repair is strongly advisable, as DIY treatment may not reach deep enough to fully neutralise the source.
7. Rubber Gloves and Protective Equipment
Carpet cleaning chemicals, even those marketed as household-safe, contain active ingredients that can cause skin irritation or sensitisation with repeated exposure. Always wear rubber or nitrile gloves when handling stain removers, pre-sprays, enzyme treatments, and adhesive solvents.
If you are working in a poorly ventilated space — such as a bedroom with limited airflow — a basic disposable face mask is worth wearing during the application of solvent-based products. Adequate ventilation throughout the cleaning and repair process is important both for personal safety and to help the carpet dry more quickly.
8. A Moisture Meter
This is the tool most DIY repairers have never heard of but should absolutely own. A moisture meter — a small, inexpensive device available from most hardware stores — measures the moisture content of materials including carpet backing, underlay, and subfloor.
Knowing the precise moisture level of your carpet before beginning a repair eliminates the guesswork around drying time and gives you confidence that adhesives and tapes will bond correctly. A reading above the recommended threshold for your specific adhesive product is a clear signal to continue drying before proceeding, regardless of how dry the surface feels.
For homeowners investing time and money into a quality repair, a moisture meter is a worthwhile addition to the toolkit that pays for itself the first time it prevents a repair from failing due to sub-surface dampness.
Bringing It All Together
Having the right cleaning supplies assembled before beginning a carpet repair is not about overcomplicating a simple job — it is about giving the repair the best possible foundation for a result that lasts. Each item on this list addresses a specific failure point that, left unmanaged, can undermine even technically skilled repair work.
The difference between a carpet repair that looks great for years and one that lifts, smells, or discolours within months almost always comes down to preparation. Across Melbourne, homeowners who want a repair outcome they can genuinely rely on understand this — which is why the benchmark set by professional Carpet Repair Melbourne services always begins with thorough, systematic preparation long before the repair itself commences.
Final Thoughts
Carpet repair done right is a rewarding and cost-effective alternative to full carpet replacement. But done without proper preparation and the right cleaning supplies, it is an exercise in frustration that often results in a second, more expensive repair job down the track.
Invest in the right tools, follow the preparation process methodically, and give the cleaning stage the time and attention it deserves. The repair itself will be more straightforward, more durable, and more visually satisfying as a direct result.
Categorias
Leia mais
" Exactitude Consultancy That Adds Flavour To Your Success" Smart Electricity Meters Market: AMI infrastructure, grid modernization, and real-time energy monitoring for residential and utility sectors. Exactitude Consultancy has just launched its latest market research report, titled "Smart Electricity Meters Market: Market Size, Share, Growth Outlook & Industry Analysis Report:...
A properly functioning drainage system is essential for maintaining a clean, safe, and comfortable living or working environment. When drains become clogged, they can disrupt daily routines, cause unpleasant odors, and even lead to serious plumbing issues if not addressed promptly. This is why professional services like Unclog Drains Venice FL and Sarasota Drain Cleaning are crucial for...
In today’s fast-paced world, our bodies are constantly exposed to pollution, processed foods, and stress. Over time, these factors can lead to fatigue, low energy, and a feeling of heaviness. This is where the concept of Detox becomes important. A proper detox is not about extreme diets or starvation. It’s about supporting your body’s natural ability to...
The Gpu Cloud Access Technologies Market was valued at USD 6.5 billion in 2024 and is projected to reach USD 18.2 billion by 2034, registering a CAGR of 10.8%. The Global Gpu Cloud Access Technologies Market research study published by Reports and Data is an extensive collection of insightful information about the Gpu Cloud Access Technologies industry. The report covers the Gpu Cloud...

Executive Summary Automotive Soft Trim Interior Materials Market : The global automotive soft trim interior materials market size was valued at USD 11.91 billion in 2024 and is expected to reach USD 17.34 billion by 2032, at a CAGR of 4.80% during the forecast period Automotive Soft Trim Interior Materials Market analysis report is a professional and a...